


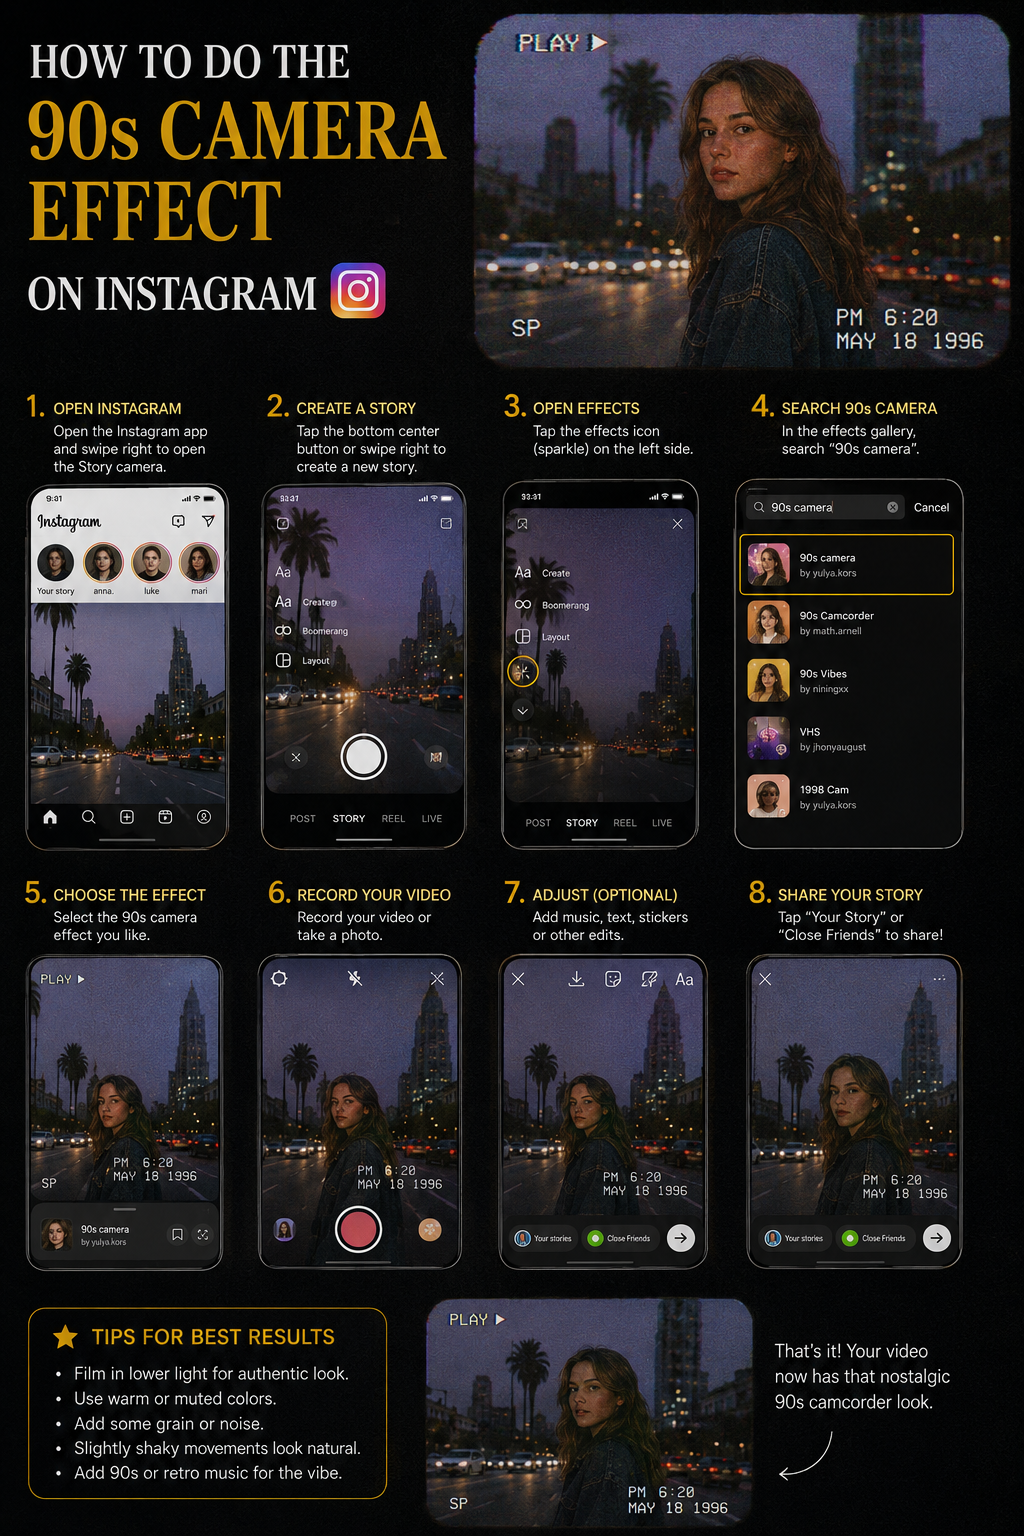
You can create the effect directly inside Instagram Reels when a suitable camera effect appears in your account, but you can also build it manually with Instagram’s filters, text, music, clip editing, and transition tools. For a more detailed result, Meta’s Edits application or an external editor such as CapCut gives you greater control over grain, blur, color, overlays, sound, and the exact timing of every glitch. Instagram’s official Reels recording guide confirms that creators can add effects and music while recording, while the platform’s Reels effects guidance explains that these creative controls appear within the Reel recording tool menu.
The exact name of a 90s inspired effect can vary according to your device, region, account, and Instagram version, so you may not always find one universal filter called “90s Camera.” You may instead see options described as VHS, analog, camcorder, retro video, vintage television, old tape, home movie, or 1990s. For that reason, learning how the visual style works is more useful than depending entirely on a single effect that may later be renamed, changed, or removed.
Definitions: What Is the 90s Camera Effect? 📹
The 90s camera effect is a digital recreation of the appearance associated with consumer camcorders, VHS recordings, television footage, family videos, school performances, birthday parties, weddings, holidays, music videos, and casual home recordings from the 1990s. These videos often appeared softer and less stable than modern digital footage because the cameras, lenses, recording tapes, television screens, and playback systems had technical characteristics that produced visible imperfections.
A convincing 90s camera effect normally combines several details rather than relying on one filter. These details may include reduced sharpness, slightly faded colors, lifted black areas, visible video noise, horizontal lines, unstable tracking, oversaturated reds, blue or red outlines around bright objects, small frame jumps, a recording symbol, and a date or time displayed near one corner of the screen. The effect may also use a traditional 4:3 composition inside the vertical Instagram frame to imitate the proportions of older television and camcorder footage.
The audio contributes to the illusion as well. Quiet tape hiss, reduced high frequency clarity, a mechanical camera sound, mild distortion, or a short static transition can make the video feel more believable, although the main music, narration, or dialogue should always remain easy to understand. A nostalgic effect should create atmosphere without making the content uncomfortable to watch or difficult to hear.
The 90s camera effect is not exactly the same as film grain. Film grain usually imitates the organic texture of photographic film, while a 90s camcorder style recreates the electronic behavior of analog video tape. Film inspired footage may contain grain, scratches, and light leaks, whereas VHS inspired footage commonly includes scan lines, tracking problems, color bleeding, rolling frames, and television static. You can combine the two styles, but a realistic camcorder effect usually depends more heavily on video noise and electronic distortion.
Think of modern smartphone footage as a perfectly printed digital photograph, while the 90s camera effect resembles a handwritten postcard that has remained inside a family album for many years 💛. The postcard may have faded edges and imperfect colors, but those imperfections give it warmth, history, and emotional character.
Why Is the 90s Camera Effect Important on Instagram?
Instagram users regularly encounter bright, sharp, stabilized, and carefully polished Reels, which means a softer and more textured video can immediately interrupt the familiar visual pattern. When viewers notice faded colors, an old date stamp, gentle noise, or a camcorder inspired frame, they often understand the nostalgic concept within the first second, making the effect useful for attracting attention without relying entirely on large text or aggressive transitions 👀.
The effect is particularly powerful because it changes how people emotionally interpret recent footage. A clean smartphone recording of friends laughing at a café may feel like simple documentation, while the same scene presented with camcorder texture can feel like a memory from an earlier chapter of life. The footage was recorded recently, but the visual treatment suggests distance, familiarity, and emotional value.
This style can work especially well for fashion creators, musicians, cafés, restaurants, photographers, travel accounts, vintage stores, artists, event professionals, wedding creators, beauty brands, lifestyle businesses, and personal storytellers. A fashion brand can introduce a collection inspired by earlier decades, a musician can make a rehearsal feel like an archive recording, and a travel creator can turn a weekend journey into something resembling an old family holiday tape.
The effect should still support a clear message. A nostalgic filter cannot replace an interesting subject, useful information, emotional connection, or thoughtful editing. The 90s texture should behave like the frame around a photograph, strengthening the image without becoming more important than the image itself.
Main Elements of the 90s Camera Effect
| Element | Purpose | Recommended Strength | Common Mistake |
|---|---|---|---|
| Soft image detail | Reduces modern smartphone sharpness | Low | Making faces and products unreadable |
| VHS noise | Adds analog video texture | Low to medium | Creating excessive digital pixelation |
| Color bleeding | Moves red or blue color slightly beyond object edges | Very low | Turning the video into a modern glitch edit |
| Tracking lines | Imitates videotape playback errors | Occasional | Keeping strong lines visible during every second |
| Date stamp | Creates an immediate camcorder identity | Small and simple | Using an unrealistic or distracting date |
| Handheld movement | Makes the video feel personal and spontaneous | Gentle | Shaking the camera excessively |
| Tape hiss | Adds analog atmosphere to the audio | Very low | Making speech or music difficult to hear |
| Faded colors | Reduces the perfectly clean digital appearance | Low to medium | Making every skin tone orange, green, or gray |
How to Apply the 90s Camera Effect Directly on Instagram
The fastest method is to search for a suitable effect inside the Instagram Reels camera. Open Instagram, tap the creation button, choose Reel, and open the Effects area from the recording tool menu. Instagram’s official camera effects information explains that effects can be used with Instagram camera content, although the interface and available selections can vary between accounts.
Use several search phrases instead of depending on only one keyword. Try searching for 90s camera, 90s camcorder, VHS, retro video, analog camera, old tape, home movie, vintage television, camcorder, and 1990s. Preview several options because one effect may only fade the colors, while another may also add a date, scan lines, noise, frame distortion, and a recording symbol.
Step by Step Instagram Reels Method
- Open Instagram and tap the creation button.
- Select Reel from the available formats.
- Open the Effects section in the camera controls.
- Search for VHS, camcorder, 90s camera, analog, or retro video.
- Preview several effects under the same lighting you will use for recording.
- Save promising effects when a save option is available.
- Record a short five second test clip.
- Review faces, hair, clothing, bright lights, shadows, and movement.
- Record the final Reel using several short clips rather than one long recording.
- Trim unnecessary moments at the beginning and end of each clip.
- Add music, original audio, captions, and simple text.
- Choose a clear cover image and review the complete Reel before publishing.
A short test is essential because some effects look convincing while the camera remains still but become unstable when the subject moves. Bright windows, reflective surfaces, glasses, fast gestures, and dark backgrounds may cause the effect to create excessive distortion. Testing allows you to change the lighting, position, or filter before recording the complete Reel.
How to Build the 90s Camera Look with Instagram Tools
You can still create a retro camera appearance when a suitable one tap effect is unavailable. Record the footage first, open the Reel editor, and combine Instagram’s clip tools, filters, music, text, and effects. Instagram’s official Reels help section confirms that Reels can contain camera footage, uploaded clips, music, effects, and voiceovers, giving creators enough flexibility to assemble a simplified vintage edit directly inside the application.
Begin with a filter that slightly softens contrast, fades black areas, warms highlights, or introduces a mild green or blue cast. Avoid accepting the strongest available intensity automatically, because a filter often looks more believable when its influence remains subtle. The subject’s skin, clothing, products, and important environmental details should still appear recognizable.
Add a small date or time display with Instagram’s text tool. A date such as “JUL 16 1997” can immediately communicate the camcorder concept, but the typography should remain simple, compact, and easy to understand. Place the text near a corner while keeping it away from the interface areas where Instagram displays account information, captions, audio, and engagement controls.
Divide the Reel into short clips and use one or two brief disturbances between selected scenes. A quick flash, momentary blur, small frame movement, or static effect can imitate the moment when a camcorder stopped and started recording. Do not place a dramatic glitch between every clip because repeated distortion quickly makes the edit feel like a modern template rather than an authentic home video.
How to Create the Effect with Meta Edits
Meta’s Edits application provides more detailed control when Instagram’s native Reel editor does not offer enough flexibility. Meta describes Edits as a mobile video creation application with a frame accurate timeline, clip level editing, transitions, effects, project management, high quality export, and direct sharing to Instagram and Facebook. The application can also export videos without an added watermark, allowing the finished file to remain visually clean.
Open Edits, create a new project, import your vertical footage, and arrange the clips before adding effects. Search the available video effects for retro, noise, distortion, vintage, blur, or similar treatments, then adjust each clip individually when necessary. Meta’s official Edits effects guide explains that effects can be applied through the project editing view after selecting a video clip.
A practical Edits workflow begins with basic trimming, followed by exposure correction, color treatment, texture, transitions, text, and audio. This order prevents you from spending time perfecting an effect on a clip that may later be removed or shortened. Use a gentle base texture across the complete video, then add stronger distortion only at selected moments.
How to Create a Stronger 90s Effect in CapCut
CapCut is useful when you want precise control over VHS overlays, scan lines, grain, color separation, opacity, blending, and audio. CapCut’s official VHS overlay guide describes VHS overlays as visual layers that reproduce scan lines, color distortion, tape noise, and tracking errors associated with older video recordings.
Manual CapCut Workflow
- Open CapCut and create a new vertical project.
- Import your footage and arrange the clips on the timeline.
- Trim pauses, camera preparation, and unnecessary sections.
- Open the Effects area and search for VHS, analog, retro, camcorder, noise, or old television.
- Apply a subtle base texture across the footage.
- Use stronger tracking or static effects only at selected moments.
- Reduce sharpness and contrast slightly.
- Lift the darkest areas and soften bright highlights.
- Add a restrained red or blue color separation effect when appropriate.
- Insert a date stamp or REC indicator.
- Add quiet tape hiss beneath the main sound.
- Review the video at normal smartphone size.
- Export the finished video and upload it to Instagram.
When using a template, remember that other creators may use the same transitions, timing, frames, and graphic elements. Personalize the result through your clip selection, captions, music, date, colors, and storytelling structure so the Reel does not feel like a copy of hundreds of similar videos.
How to Use a VHS Overlay
A VHS overlay is a separate video layer containing animated static, tracking lines, scan lines, noise, flicker, timecodes, or recording symbols. Place the overlay above your original footage in a timeline based editor, then use opacity or blending controls to integrate it with the underlying video.
If the overlay contains a black background with bright noise or scratches, a lightening blend mode such as Screen may remove much of the black area while preserving the texture. When the overlay uses gray tones, Overlay or Soft Light may create a more balanced result. Blend mode names differ between applications, so preview several options and choose the one that preserves the subject most clearly.
Use a soft noise layer throughout the video and reserve strong tracking errors for the opening, a transition, a camera movement, or the final moment. Authentic analog imperfections generally appear irregularly, which means predictable glitches repeated at identical intervals usually feel artificial.
A Practical 90s Color Grading Recipe 🎨
No universal numerical formula works for every video because lighting, skin tones, camera processing, locations, and clothing colors vary, but a balanced starting point is to lower contrast slightly, reduce modern digital sharpness, lift the deepest shadows, soften highlights, decrease saturation modestly, and introduce a gentle warm, green, or blue color bias.
For a warm family video style, use creamy highlights, faded black areas, gentle warmth, and slightly restrained saturation. For a streetwear or music video, cooler shadows, stronger reds, and a small amount of color bleeding may work better. For an old television appearance, use horizontal scan lines, lower clarity, mild flicker, and cooler tones.
Make one adjustment at a time and compare the edited footage with the original regularly. When you change contrast, saturation, temperature, blur, grain, tracking, flicker, and color separation simultaneously, it becomes difficult to identify which adjustment improved the result and which one damaged it.
How to Record Footage That Naturally Feels Like the 1990s
The final effect becomes much more convincing when the original footage already supports the visual style. Record several short handheld clips instead of one perfectly stabilized continuous shot, but keep the movement controlled enough that viewers can understand the subject. Small natural movements feel personal, while violent shaking simply makes the Reel uncomfortable to watch.
Choose subjects and locations that naturally support nostalgia, such as friends laughing, birthday tables, old furniture, quiet cafés, record stores, concerts, streetlights, vintage cars, seaside walks, printed photographs, family meals, hotel corridors, school events, sunsets, and holiday gatherings. Modern environments can still work, but the styling should contain enough visual character to make the effect feel intentional.
Capture multiple perspectives. Begin with a wide shot that introduces the location, continue with a medium shot showing the person or activity, and add close details such as hands, clothing, food, accessories, decorations, shoes, reflections, or facial expressions. This variety creates rhythm and reduces the need to cover every moment with strong effects.
Avoid extremely dark environments unless darkness forms part of the concept. Smartphone footage recorded without enough light may contain uncontrolled digital noise that looks different from analog VHS texture. Use window light, lamps, shop lighting, streetlights, or soft indirect illumination to keep important subjects readable.
90s Camera Effect Workflow Diagram
Choose a Nostalgic Story
          ↓
Record Short Vertical Clips
          ↓
Arrange and Trim the Footage
          ↓
Reduce Digital Sharpness
          ↓
Apply Faded Color Grading
          ↓
Add Fine VHS Noise
          ↓
Insert Occasional Tracking Errors
          ↓
Add a Date or REC Indicator
          ↓
Apply Subtle Tape Audio
          ↓
Review at Smartphone Size
          ↓
Export and Publish on Instagram
Examples of 90s Camera Reels
Example One: A Summer Memory
Record friends walking toward the sea, opening cold drinks, sitting near the water, laughing, and watching the sunset. Use warm faded colors, a small date stamp, gentle handheld movement, fine noise, and one brief tracking disturbance at the beginning. Allow short sections of natural sound to remain beneath the music so the memory feels lived rather than completely manufactured 🌅.
Example Two: A Retro Fashion Reel
Record a full outfit, shoes, accessories, fabric details, and a short walking sequence. Use cooler shadows, stronger reds, restrained color bleeding, and a 4:3 frame placed inside the vertical Instagram project. Keep the grain low enough that viewers can still understand the fabric, fit, and design.
Example Three: A Café Reel
Capture the entrance, coffee preparation, steam, wooden tables, a book, a friend smiling, and the street outside. Use warm highlights, faded blacks, quiet tape hiss, and a short static transition. The final result should feel like a remembered evening rather than an aggressive commercial advertisement ☕📼.
Example Four: A Music Performance
Record a musician in a rehearsal room, bedroom, garage, or small venue. Use low contrast, a subtle green cast, soft highlights, handheld movement, and mild audio texture. Place one stronger glitch when the music begins and another when the video ends.
An Illustrative Editing Anecdote
Illustrative first person example: “When I created my first 90s inspired edit, I added heavy noise, scratches, green color, tracking lines, camera shake, light leaks, a date stamp, color separation, static, and several glitch transitions at the same time. Every effect looked attractive when I viewed it separately, but the completed video felt crowded and the people became difficult to see. I removed most of the layers, kept only a soft color grade and fine VHS noise, and used two brief tracking errors. The simpler version immediately felt warmer and more believable.”
This example demonstrates a common editing lesson: authenticity usually comes from controlled imperfection rather than maximum distortion. Real family recordings did not display every possible tape problem during every second, so a calm visual base with occasional flaws often creates a more realistic result.
How to Create an Emotional Connection 💛
The strongest 90s camera Reels do more than imitate old equipment. They remind viewers of a time when people recorded birthdays, holidays, and ordinary family moments without immediately reviewing every frame or preparing every gesture for social media. These videos often contained awkward pauses, imperfect composition, spontaneous laughter, and unexpected movement, but those ordinary details later became emotionally valuable.
Allow some genuine imperfections to remain in your Reel. Keep a spontaneous laugh, someone looking away from the camera, a hand entering the frame, a short pause, or a slightly imperfect camera movement. These details make the content feel observed rather than staged.
The VHS effect works like fading on an old photograph. The fading does not create the memory, but it reminds the viewer that the moment has travelled through time. Your people, places, expressions, and story create the emotional meaning, while the visual texture gives that meaning a nostalgic form.
Common Mistakes to Avoid
Using Constant Glitches
Continuous strong distortion quickly becomes tiring and usually looks like a modern effect preset. Keep major glitches short, irregular, and connected to meaningful transitions.
Applying Too Much Blur
Old camcorder recordings were soft, but faces and important objects remained recognizable. Excessive blur makes the Reel look badly compressed rather than intentionally nostalgic.
Making Every Color Orange
Warm tones can create nostalgia, but realistic 90s footage may also include cooler shadows, green casts, strong reds, and neutral skin tones. Preserve enough color variation to keep the image believable.
Using an Illogical Date
A date stamp should support the narrative. A 1994 date on footage containing highly recognizable modern devices can work as deliberate humor, but it may weaken the illusion when used unintentionally.
Adding Excessive Camera Shake
Gentle handheld movement creates intimacy, while uncontrolled shaking distracts from the story and can make viewers uncomfortable.
Destroying Audio Clarity
Tape hiss and distortion should remain beneath the main sound. Viewers should still understand narration, dialogue, music, lyrics, or product information.
Ignoring Lighting
Very dark smartphone footage may already contain unpleasant digital noise. Provide enough light before adding intentional VHS texture.
Using the Effect Without a Story
A vintage appearance cannot create emotional meaning by itself. Choose clips that show an activity, relationship, place, transformation, or memorable sequence.
People Also Asked
Does Instagram have an official 90s camera effect?
Instagram provides camera effects and Reel editing tools, but there may not be one universal option called “90s Camera” for every account. Search for VHS, camcorder, analog, old tape, vintage video, and related expressions.
Why can I not find the same effect another creator used?
The creator may have used a different application, an Edits effect, a CapCut template, a manually created overlay, or an effect that is not available for your device or account. The effect may also have been renamed or removed.
Can I create the effect without downloading another application?
Yes. You can combine an Instagram camera effect, a faded filter, a small date stamp, brief transitions, suitable music, and handheld footage. External applications simply provide more detailed control.
Should a 90s Instagram Reel use a 4:3 frame?
The overall project should remain vertical for Instagram, but you can place a traditional 4:3 image inside the vertical canvas to create a recognizable camcorder composition.
Can businesses use the 90s camera style?
Yes. Fashion brands, cafés, musicians, travel businesses, event companies, photographers, vintage stores, and lifestyle brands can use the style effectively, provided essential products and messages remain visible.
Frequently Asked Questions
1. Which keywords should I search for in Instagram Effects?
Search for 90s camera, 90s camcorder, VHS, retro video, analog camera, old tape, home movie, vintage television, camcorder, and 1990s.
2. How strong should the VHS noise be?
The noise should remain visible without hiding faces, captions, products, clothing, or important background details. Begin with a low intensity and increase it slowly.
3. Should tracking lines remain visible throughout the Reel?
No. Fine noise may remain throughout the video, but stronger tracking lines should appear only during selected transitions, the opening, or the ending.
4. How can I make modern footage appear older?
Reduce sharpness, soften contrast, fade the black areas, add restrained noise, introduce slight color bleeding, use gentle handheld movement, and add a simple date stamp.
5. What music works with a 90s camera Reel?
Retro pop, alternative rock, hip hop, dance music, dreamy electronic tracks, soft instrumentals, and emotionally familiar songs can all work, depending on the story.
6. How do I make a date stamp look realistic?
Use a small plain font, consistent spacing, a simple color, and a logical corner position. Avoid decorative typography or oversized text.
7. Why does my effect look like a modern glitch edit?
You may be using too much color separation, rapid distortion, sharp transitions, camera shake, or constant static. Reduce the effects and allow longer uninterrupted sections.
8. Can I use the effect on product Reels?
Yes, but keep labels, colors, materials, and demonstrations easy to understand. Apply stronger distortion between product shots rather than over essential information.
9. How can I prevent compression from ruining the effect?
Export the video once at a suitable quality, avoid repeatedly saving it through several applications, and use a texture that remains visible without becoming excessive.
10. Is Meta Edits better than Instagram for this effect?
Instagram is faster for simple recording and publishing, while Edits provides a more detailed timeline and clip level control. The better option depends on how customized you want the final result to be.
Conclusion
Creating the 90s camera effect on Instagram involves much more than selecting a vintage filter. A believable result combines thoughtful recording, gentle handheld movement, faded colors, soft details, restrained VHS noise, occasional tracking errors, a simple date stamp, suitable sound, and a subject that naturally supports nostalgia 📼✨.
Instagram’s native camera effects provide the quickest workflow, while the platform’s filters, text, music, and clip editing tools allow you to build a simple version manually. Meta Edits provides more control over individual clips and effects, while CapCut offers detailed options for overlays, blending, grain, color separation, tracking distortion, and audio.
The most important principle is moderation. Do not cover every second with heavy static, blur, scratches, and glitches. Let the people, products, locations, and expressions remain visible, then use analog imperfections to strengthen the mood. Review the Reel at normal phone size and remove anything that distracts from the story.
A successful 90s camera Reel should not feel like a demonstration of editing tools. It should feel like a memory that someone recorded, stored, and finally decided to share, and when viewers notice the emotion before they notice the filter, the effect has achieved its real purpose 💫.

